


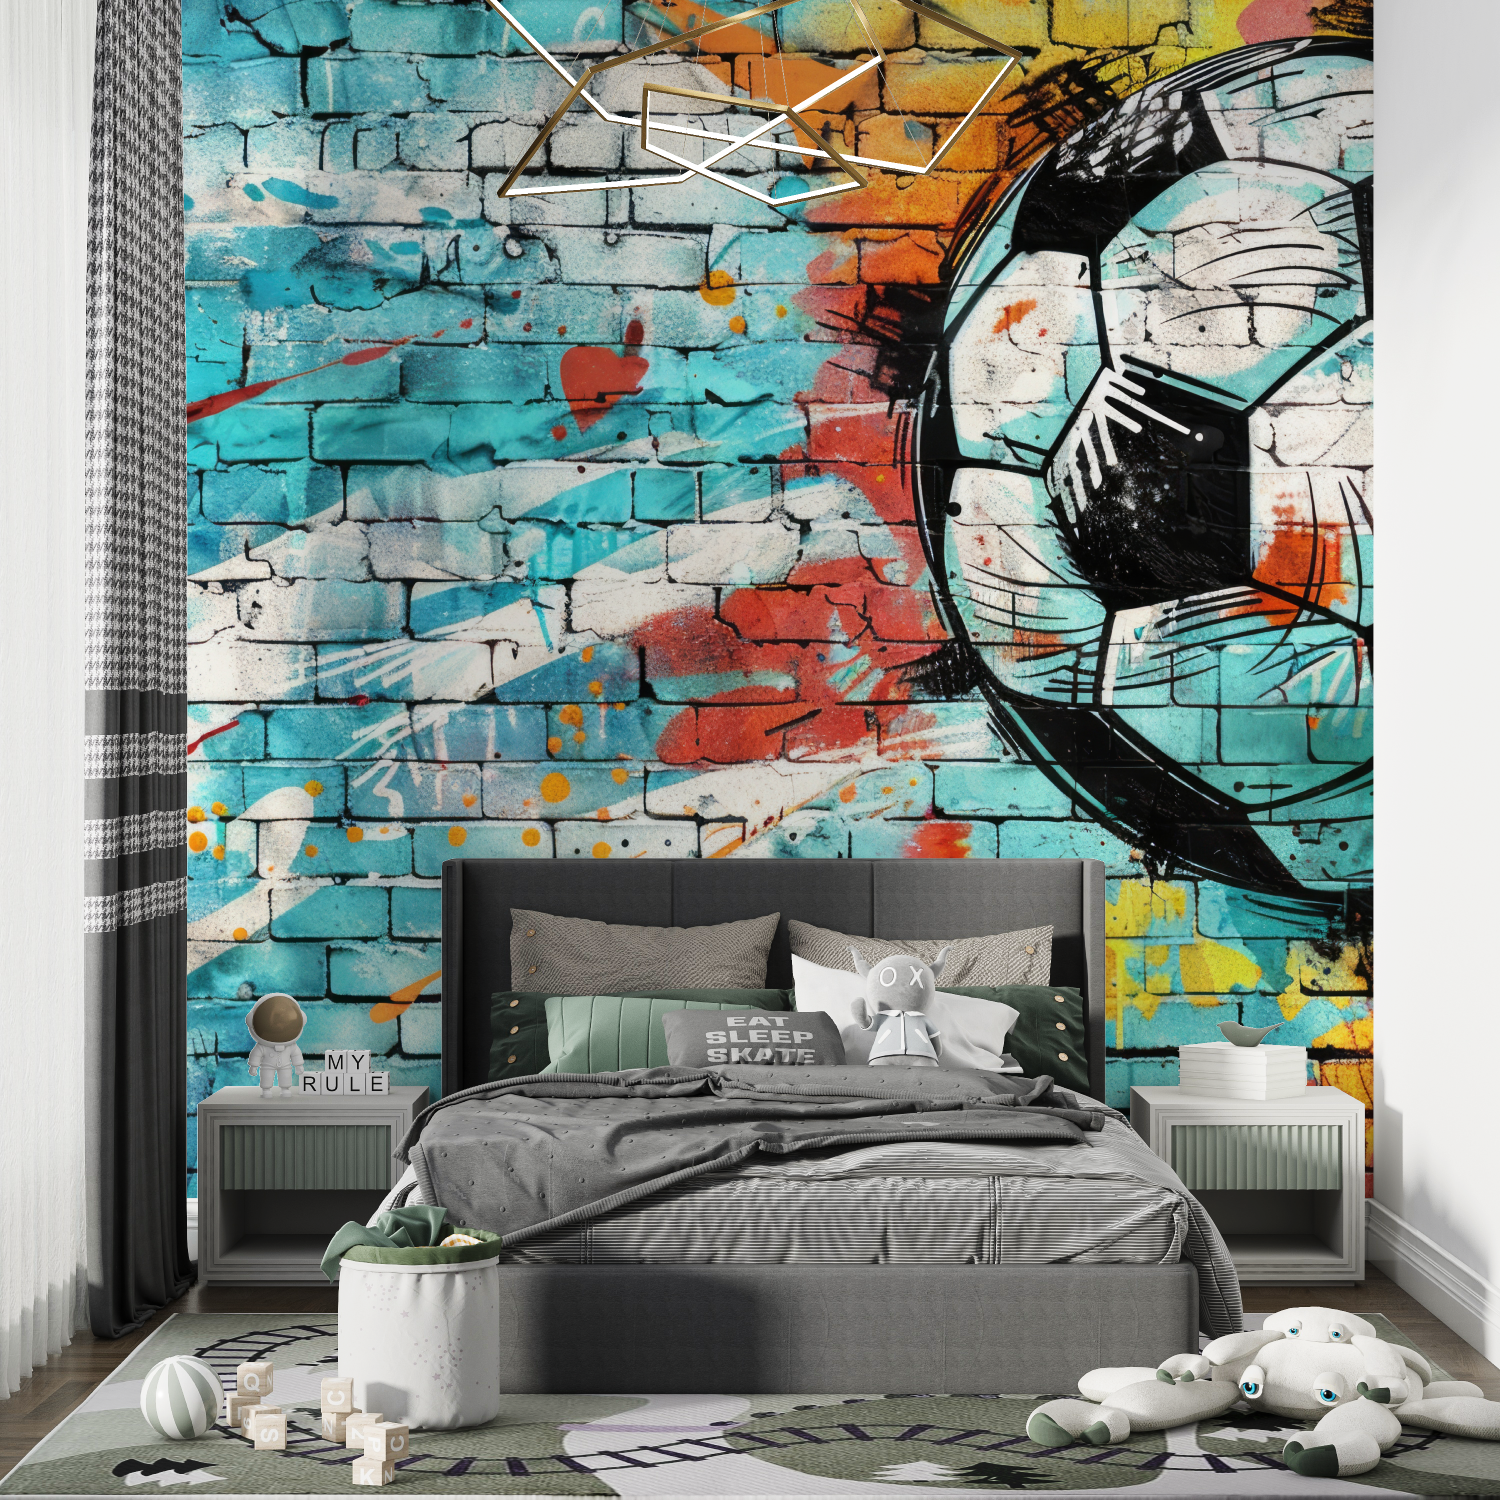


Mural Graffiti Soccer Wallpaper
 Custom to your wall size
 Edge-to-edge joint: easy to install
Not sure? Get a sample!
See how it looks with your lighting and décor.
Classic and Peel & Stick samples
Compare feel and finish of our materials
Order Processing Time: 1–3 business days
Delivery Time: 5–8 business days
Total Delivery Time (processing + Transit): 6–11 business days
Meet the Graffiti Soccer Wallpaper—a real firework show for your walls! This wallpaper is bursting with bold colors and buzzing patterns, grabbing attention the moment you walk in. Whether you’re sprucing up a bedroom or jazzing up a creative corner, its urban-inspired look is just the ticket for anyone craving a splash of fun and a modern twist. With a head-turning design that packs a punch, it’s your shortcut to breathing fresh life into any space.
- Bright and contemporary
- Perfect for teen rooms
- Quick and easy to install
- Pumps up creativity and energy
What Makes the Graffiti Soccer Wallpaper So Special?
The Graffiti Soccer Wallpaper stands out thanks to its lively, electric design. Picture graffiti splashes teamed up with a giant soccer ball—now that’s an energy boost waiting to happen!
Splashes of bold colors—from deep blues and fiery reds to sunny yellow—blend together over a brick wall backdrop, nailing that urban, up-to-date vibe. This artistic mashup appeals to die-hard sports fans and anyone eager to add a dash of quirky charm and zest to their home.
Tapping right into the latest decor trends, it instantly turns any wall into a true statement piece—an art gallery vibe, without the stuffiness.
How Does Graffiti Soccer Wallpaper Transform Your Room?
Rolling out Graffiti Soccer Wallpaper in a room is like flipping a switch—it completely revamps the space. It doesn’t just pretty things up; it changes the entire mood.
Expect a wave of energy and cool modern style, perfect for turning a teen’s bedroom or a home office into a hotbed of creativity. The bold colors and sharp design give the room a shot of positive vibes and get those creative juices flowing.
Suddenly, your room is more than just four walls—it’s a go-to hub for inspiration, where motivation comes as naturally as breathing.

Easy to Install
The installation of our modern wallpapers is surprisingly simple and quick.

Non-Woven
Premium non-woven material. Each panel is 50 cm (19.7 inches) wide.

Custom Wall Size
Customized for your wall. You decide the exact size and the design crop.

Eco-Friendly
We use eco-friendly inks and our materials are 100% PVC-free.
How to Measure Your Wall
Follow our simple guide to ensure a perfect fit. We recommend adding a 5 cm (2 inches) safety margin to your total width and height measurements.
1. Standard Walls
Measure the full width and height of your wall. Double-check your numbers and remember to include your safety margin for a seamless installation.

2. Sloped Walls
Identify the highest and widest points of the wall. Ignore the slopes during measurement; we will print a full rectangle to be trimmed on-site.

3. Multi-Sloped Walls
Measure the maximum height and width. Like single slopes, the wallpaper is delivered as a complete graphic that you trim to fit the angles.

4. Windows & Doors
Measure the entire wall surface as if there were no obstacles. Do not subtract the area of doors or windows to ensure pattern continuity.

5. Multiple Walls
Combine the widths of all connecting walls. Measure the height from the highest point and treat the entire surface as one continuous piece.

6. Staircases
Measure the vertical distance between the highest and lowest points. Treat the sloped section as a standard rectangle for printing purposes.

Hanging Instructions
- ✔ Panels are numbered in hanging order
- ✔ Installation should go from left to right
- ✔ Apply panels edge-to-edge (no overlap)
Recommended Tools
 Bucket
 Spirit Level
 Pencil
 Wallpaper Brush
 Roller & Tray
 Ruler
Ruler
 Utility Knife
 Trim Guide
 Paste Brush
 Sponge/Cloth
 Seam Roller
Preparation
1. Surface Check
Walls must be clean, dry, and smooth. Remove any old wallpaper or flaking paint. If your wall is highly porous (new plaster), apply a primer coat first to ensure the best adhesion.
2. Mix Wallpaper Paste
Use a high-quality adhesive designed for non-woven materials. Mix thoroughly with water until you achieve a consistent, thick paste. Let it rest for 5 minutes before application.
Hanging
1. Organize Panels
Verify all panels before starting. They are numbered at the top to guide your sequence. Lay them out to ensure the design flow is correct from left to right.
Installation
2. Set the First Panel
This is the most important step. Use your spirit level to mark a perfectly straight vertical line 50 cm from your starting point. Align your first panel exactly to this line.
3. Apply Paste to Wall
Apply the paste directly to the wall using your roller. Cover an area slightly wider than the panel you are about to hang to ensure the edges stick perfectly.
4. Seamless Alignment
Press panels together tightly at the seams without overlapping. Use your wallpaper brush to smooth out bubbles, working from the center toward the edges.
5. Finishing Touches
Trim excess paper at the ceiling and floor using a sharp utility knife and trim guide. Clean any excess paste with a damp sponge and allow 24 hours to dry.
Peel & Stick Guide
Our self-adhesive wallpaper is designed for a mess-free transformation. No extra glue needed—simply peel the backing and apply to your wall for an instant new look.
Required Tools
Spirit Level
Ruler
Pencil
Utility Knife
Wallpaper Brush
Soft Squeegee
Preparation
1. Clean Your Wall
Use a damp cloth with mild soap to wipe down the surface. Ensure the wall is completely dry, smooth, and free of dust. For freshly painted walls, wait at least 4 weeks before installation to allow the paint to fully cure.
2. Acclimate the Panels
Unroll your panels and let them lay flat in the room where they will be installed for at least 24 hours. This allows the material to adjust to the room's temperature and humidity.
3. Organize Your Layout
Check all panels for any defects. Each panel is numbered at the top. Arrange them in numerical order to ensure the pattern flows correctly from left to right.
Application
1. The Vertical Guide
Use your spirit level to mark a faint vertical line one panel width from your starting point. This ensures your first panel—and the rest of your wall—is perfectly straight.
2. Peel and Stick
Peel back about 12 inches of the backing paper from the top. Align the panel with your vertical line and smooth it onto the wall. Gradually peel more backing as you work your way down.
3. Remove Bubbles
Use a soft squeegee or wallpaper brush to remove air bubbles. Work from the center of the panel outwards towards the edges with firm, even strokes to ensure strong adhesion.
4. Final Trimming
Once all panels are edge-to-edge (no overlapping), use a sharp utility knife and a ruler to trim the excess material along the ceiling and floor for a clean finish.
Free shipping to the United States and the United Kingdom.
Custom-made for you.
Total delivery (processing + delivery time): 6-11 business days.
Every wallpaper we produce is made to order. Whether you select a standard size or provide custom dimensions, our team tailors the product specifically for your space. Please note that Total Shipping Time = Processing & Tailoring + Delivery Time.
Order Timeline- Processing & Tailoring: 1–3 business days. This includes professional printing and quality checks.
- Delivery (United States): 5–8 working days via SunExpress, DHL, or UPS.
- Shipping Cost: Free shipping on all orders within the United States and the United Kingdom
-
Customs Duties: All product prices are inclusive of customs duties. No hidden fees.
Order Cut-off:Orders placed before 2:00 PM (Monday–Saturday) (GMT+01:00) Central European Standard Time (Madrid) are processed the same day.
Please be aware that shipping times may be affected by national holidays. During peak seasons like Christmas, lead times may extend to approximately 20 working days due to high volume. We appreciate your patience.
Questions? Contact us at: contact@wall-mural-shop.com
Classic Wallpaper
Quick and effortless application for a professional result. High-quality breathable material for long-lasting durability.
- Glue applied to wall
- Does not fade in sunlight
- PVC-free and eco-friendly
- Fire rated
- Washable
- Matte finish
Peel & Stick Wallpaper
Sustainable production with PVC-free and safe materials. Tailor-made dimensions to fit your space perfectly.
- Renter Friendly
- Self-adhesive
- Easy to install and remove
- Best for smooth walls
- Environmentally friendly
- Washable & Matte finish
Payment & Security
Your payment information is processed securely. We do not store credit card details nor have access to your credit card information.
Mural Graffiti Soccer Wallpaper
Custom to your wall size
Edge-to-edge joint: easy to install
Not sure? Get a sample!
See how it looks with your lighting and décor.
Classic and Peel & Stick samples
Compare feel and finish of our materials
Order Processing Time: 1–3 business days
Delivery Time: 5–8 business days
Total Delivery Time (processing + Transit): 6–11 business days